
If you are a first-timer, you may not be sure whether you’re into tattoos or not. Nonetheless, there is a stress-free way to find out if you love these body arts or not. You can try out a temporary tattoo.
Unlike permanent tattoos, temporary tattoos are removable. If you don’t like it, you can always clean it out. They are also easy to make. Most tattoo artists that use rotary and coil machines started by learning how to make temporary tattoos themselves.
How to Make Your Own Tattoo
To help you to get started on the art of tattooing, I will show you how to make a temporary tattoo. Here is my step by step guides. They are easy to follow so you don’t have to sweat. Take a look.
Method One: Using the Tracing Paper
To use the tracing paper, you will require several materials. These materials will include the following:
- A tracing paper or wax paper
- Print-out of desired tattoo image in real size
- Tattoo pen
- Temporary tattoo paint
- Liquid bandage
- Felt pen or Eyeliner
- Washcloth
- Cotton ball
- Rubbing alcohol
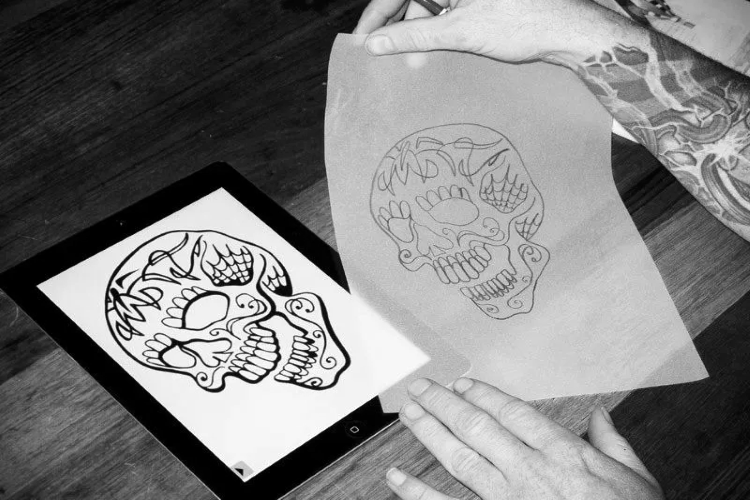
Step I: Set Image Under Tracing Paper
Take your tracing paper and set it on top of your desired image. Make sure the image falls within the tracing paper. Remember, the desired image should be at the desired size too.

Step II: Re-Trace the Image
Now retrace over the image on the tracing paper. Make sure to hold the tracing paper in position until you are done. Do not move the paper or else the image will break. Use eyeliner or the tip of a felt pen.
Step III: Cut Out Your Image
Next, you should cut-out your image. Remove any excess paper so that you remain with only the image. For a start, I would suggest going by a simple image. That way, you’ll find it easy cutting out the image.
Step IV: Clean the Area You Want to Tattoo
Use the cotton ball and the rubbing alcohol to clean the area you intend to tattoo. Rub it properly to remove dirt. Once this is done, let the area dry. Make sure it is completely dry before you go into the next process.
Step V: Transfer the Image
Take your tracing paper and place it face down on your skin. Then take a paper towel or washcloth that’s dampened with warm water and use it to dampen the tracing/wax paper. Hold the tracing paper on the place for at least 30 seconds before releasing it.
![]()
Step VI: Remove Tracing Paper
Slowly remove the tracing paper to reveal an outline of the image that you want to tattoo. Trace over the outline with eyeliner to reveal the image.
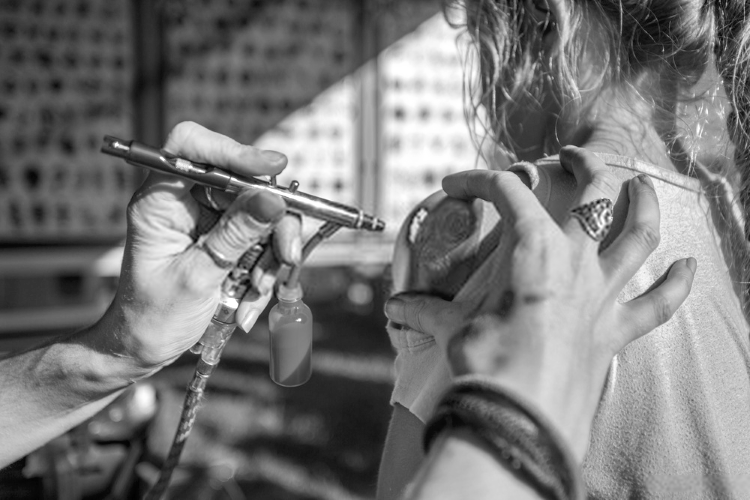
Step VII: Tattoo Your Image
Take your rotary tattoo machine with the practice ink – do not use the permanent ink. Make sure the tattoo machine is sterilized. Then start shading your image. Take care not to make deep pricks.
Step VIII: Clean the Outline
Now clean out the wax outline with the damp cloth. The outline should come out and leave you with the tattooed image. Allow the image to heal if you did it on your skin.
Notable Tips
You should be done by step VIII in method one. The temporary tattoo should last a few days. You can always clean it out using the rubbing alcohol whenever you want.
Using temporary ink makes your practice easy. You can make many images and clean them out as part of your practice. This is, however, possible if you are using a piece of cloth to practice and not your skin.
In addition to that, temporary inks that use professional tools like coil tattoo machines last relatively longer on skins. As such, they must meet the approval of the FDA. As such, they are tested to meet the right standards for use on the skin.
Remember also to use simple designs with clean-cut lines. They are the best for this method and will give you cool results.
Method Two: Using a Stencil
In this method, you’ll require more or less the same types of materials that you used above. Except for this time around, you’ll replace the tracing paper and the image with a super designed stencil.
Step I: Make Your Stencil
Create a stencil of your own desire. Make sure the stencil is cut to precision. The reason you’ll need a stencil is to allow you to easily control your tattoo design. You can print out an image and use your penknife or scissors to cut it out.
The easiest stencil to create is that of geometric shape. You can try out diamonds, hearts, circles, and triangles. If not, you can hire an expert to make a graffiti stencil for you.
Step II: Buy Temporary Ink
Get the right ink type. Temporary inks that are approved by the FDA are the best. Buy a color of your choice. If you aren’t planning on using your tattoo pen, you can buy a marker instead. Even better, a stamping ink should do.
Step III: Clean the Skin
Like we saw above, you’ll have to clean the area that you want to tattoo. If there is any hair, shave the place first to make it smooth and clean. The smooth texture will give you better results too.
The use of your cotton ball and an alcohol-based sanitizer should help. Rub the place with the damp cotton wool and leave it to dry. Ensure that it dries up completely and then proceed.
Step IV: Shade/Apply Tattoo
Take your stencil and set it on top of the area that you intend to tattoo. Use one hand to hold it in place. This enables the cutout shapes to lie flat on your skin. Take the tattoo gun with the other hand and shade the cut out areas.
If you don’t want to use your rotary tattoo gun, you can use the marker pen instead. You can also apply the stamping ink. In case you are finding it hard to hold the stencil in place and tattoo at the same time, you can use affix the stencil with an adhesive bandage/tape.
Step V: Remove the Stencil
Once you have finished shading your tattoo, you can then remove the stencil. This should reveal the tattoo. If you are satisfied with the results, allow the tattoo to dry up. You should also cover it with a clean bandage and allow it to heal.
Video Credit – VoodooGoods
NOTE: Temporary tattoos will fade with time. They can also be washed out using a cotton pad and oil. So don’t worry so much about it if you don’t like the tattoo.
Additional Methods
Apart from the two methods that we have seen, you can also design your own tattoo using these two methods.
Waterslide paper
This is an easy-to-use paper with one sidelined with a skin-friendly adhesive. To use a waterslide paper to learn how to make your own tattoo, here is what you must do.
- Buy a waterslide paper
- Design or Photoshop a tattoo image in your computer
- Include as many colors as you wish if you have a colored printer
- Stick to colors that will work for your skin
- Print out the image on your waterslide paper
- Make sure you print the image on the adhesive side
- Cut out the tattoo with a penknife or a pair of scissors
- Place the inked side on your skin and hold in place
- Cover it with a paper towel and press on the towel
- Now remove the paper towel and peel back the printed tattoo
- The adhesive will slide on your skin and reveal a wonderful tattoo
Using the Sharpie
The sharpie is used more or less like a felt pen. However, you won’t need a stencil or a tracing paper to design own tattoo. This is also simple to use and here is how I make my own tattoo using a sharpie.
- I will put together a Sharpie, a baby powder, and a hairspray
- Then I will take the Sharpie and use it to draw a tattoo directly on my skin
- After that, I will take the baby powder and rub it on to my tattoo
- Finally, I will coat it with the hairspray
The final result is usually an awesome tattoo. But this is often for fun and nothing serious.
Conclusion
If you want to learn how to make your own tattoo with a rotary tattoo machine, these guides will be helpful. Even so, you may not learn the art on the first try. As such, I implore you to remain patient and keep on practicing.
This is the trick that pro tattoo artists used to design own tattoos. Patience is, therefore key. You should practice more, make your mistakes, and start again. In any case, practice makes perfect, so it goes.
Disclaimer – This content has been made available for informational and educational purposes only and not intended to be a substitute for professional advice.